
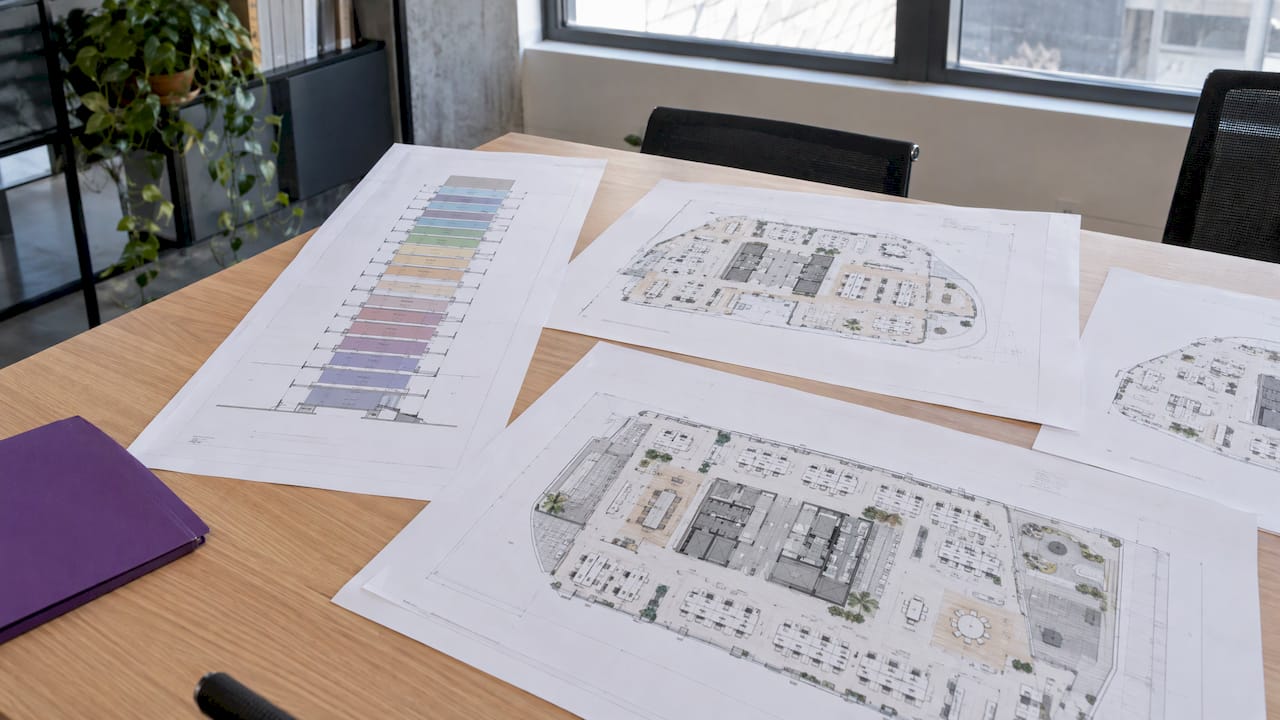
Blocking and stacking is the planning step where a spreadsheet of teams and areas becomes a building. Stacking decides which floor each team or function sits on. Blocking then arranges those teams in zones within a single floor. Get the order and the inputs right and a multi-level office works for the people in it. Get them wrong and you pay for it in walking distances, noise complaints and a fit-out redrawn halfway through. This guide explains both steps, what you need before you start, how to run the process, and where an experienced workplace strategy and fit-out team earns its place.
TL;DR
- Stacking allocates departments to floors. Blocking arranges them inside one floor. Stack first, block second, then plan desks and furniture.
- You need an area schedule (functions, headcounts, required areas) and a clear list of building constraints before you draw anything.
- Team adjacency, noise, accessible routes and room to grow decide most stacking and blocking choices.
- A stack plan is a decision tool for the whole project, so it belongs inside workplace strategy, not after the design is done.
- If you are planning a Sydney move, consolidation or refurbishment, we can take the stack plan from strategy through design to construction.
Table of Contents
- What blocking and stacking mean in an office
- Why the order matters: stack, block, then desks
- What you need before you start
- How to build an office stack plan, step by step
- What good stacking and blocking decisions look like
- A worked example
- Common mistakes to avoid
- Why workplace strategy comes before the stack
- How we can help
- FAQ
- Sources
What blocking and stacking mean in an office
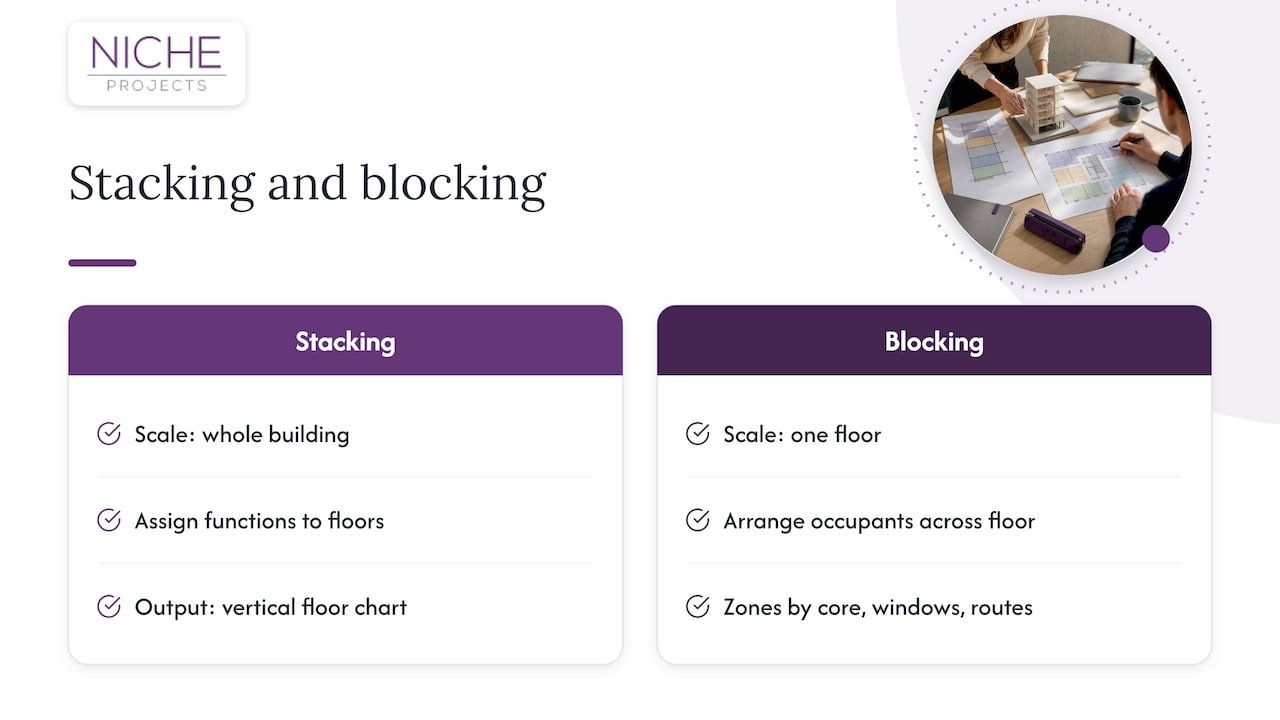
The two terms describe two scales of the same idea.
Stacking works at building scale. In a multi-level office, stacking means deciding which functions occupy which floors. The output is a stack plan: a vertical chart with one band per floor, each labelled by department or use and often annotated with headcount and area.
Blocking works at floor scale. Once a team has a floor, blocking arranges that floor’s occupants across it. A blocking diagram shows zones placed relative to the building core (lifts, stairs and services), the windows and the main circulation routes.
You may also see “stack and block”, “block and stack” or “office stacking plan”. They all point to the same pair of steps. A third level follows: the seat-level plan, where individual desks, meeting rooms and furniture are placed. Nothing at seat level should be drawn until the stack and blocks are settled.
A stack plan is not a pretty diagram. It is the document where trade-offs become visible: Finance wants to be near the executive team, Sales wants the floor with the best views for client visits, and the building’s floor plate (the usable area of a single level) cannot hold both.
Why the order matters: stack, block, then desks
Each step narrows the one before it. A stack decision fixes the area and neighbours a team has to work with. The block plan then decides how that team’s area is divided and positioned. The desk layout fills in the detail.
Reverse that order and you start drawing desk rows before you know whether the team fits on the floor, or whether the team it talks to all day is three levels away. Rework follows, and in a fit-out rework means cost and delay.
What you need before you start
A stacking plan is only as good as its inputs. Start with these.
1. An area schedule
An area schedule lists each function, its headcount and the area it requires. It is where stacking begins, and it is the document most projects underestimate. Headcount alone is a weak input. It tells you how many people are employed, not how many are in on a peak day or what they do when they are there.
That is why the area schedule should be built from how people actually use the office, then translated into space. Our guides on office space standards by role and peak occupancy and on planning to peak day density cover how to turn headcount into areas. If you are not sure how much space you need in total, start with how much office space your business really needs.
2. Floor capacity and building constraints
Every floor has a capacity, and some floors have special conditions. Examples include heavy floor loading, data rooms, double-height studios and client-facing floors that may be fixed to particular levels. Add the practical ones: where the lifts and stairs sit, where the wet areas and risers are, and which floors have the best natural light.
3. Employee consultation and how work is done
WorkSafe Victoria’s office layout guidance says employers should consider tasks, storage, furniture, movement, privacy, safety and maintenance access when allocating space, consult employees, and think about future needs. It is a Victorian regulator’s guidance, but the questions it raises apply to any Australian office. In practice, a short round of interviews or workshops with team leaders will tell you more about adjacency and noise than any org chart.
4. A view on growth and hybrid patterns
Decide how much each team is likely to grow or shrink over the lease term, and how often people attend. A team that is in four days a week needs a different block from a team that is in one day. If hybrid working is part of your model, our hybrid workplace strategy playbook sets out how to think about it before you commit to a stack.
How to build an office stack plan, step by step
Step 1: Define what the plan has to achieve
Write down the goal in one sentence: consolidating from four floors to three, moving a growing team into more space, bringing collaborating teams together, or preparing a refurbishment. The goal decides which trade-offs win. Common uses of a stack plan include consolidating teams onto fewer floors, moving growing teams to larger areas, redistributing departments to improve adjacencies and testing different mixes of collaboration and focus space.
Where it goes wrong: goals that are never written down. Each stakeholder then judges the plan against a different, unspoken goal.
Step 2: Build the area schedule
List every function with its headcount, its peak attendance and its required area, including shared spaces such as meeting rooms, breakout areas and storage. Meeting rooms are often the largest hidden variable, so use sized footprints rather than guesses. Our meeting room size guide gives CAD-ready footprints from 2 to 50 m².
Where it goes wrong: using nominal headcount for every team and ignoring that shared space is shared across teams, which inflates the total.
Step 3: Test the building
Check each candidate floor’s capacity against the schedule and note every constraint: loading limits, services, fixed-level functions, fire egress, access. A floor that looks big enough on a lease plan may lose usable area to the core, columns and risers.
Where it goes wrong: relying on the gross area from the lease. Usable area is what matters, and it is only confirmed by testing the floor plan.
Step 4: Stack the teams
Allocate each function to a floor by testing fit and capacity, access needs, adjacencies and constraints. Teams that work together go on adjacent levels, ideally connected by a feature stair so people move between floors without waiting for lifts. Put client-facing and high-visitor functions near reception or on the most accessible level. Leave some floor area unallocated for growth rather than filling every desk on day one.
Where it goes wrong: treating the stack as a puzzle of areas only. A stack that fits the numbers but separates two teams that work together daily will be undone by the people in it.
Step 5: Block each floor
Within a floor, place each team’s zone relative to the core, the windows and circulation. Loud functions belong away from quiet areas, and each floor needs a clear route through it. Think about where collaboration spaces sit so they serve several teams without sitting on top of any one of them, and where the focus areas get the daylight and the quiet.
Where it goes wrong: putting the busiest shared space next to the team that needs the most concentration, because it was the only gap left on the plan.
Step 6: Review with the people who use the space
Take the stack and block diagrams back to team leaders, HR and facilities. Ask three questions: Who does each team talk to most? What disturbs them? What will change in the next two to three years? Revise, then lock the plan before detailed design starts.
Where it goes wrong: approval that drags on. Plans often go stale before they are approved, so keep the review window short and the decision-makers in the room.
Step 7: Move to seat-level design and delivery
Only now do desks, meeting rooms and furniture get placed. This is also the point where the plan meets cost, programme and buildability. The decisions in your stack plan (which floors need new partitions, new services, new wet areas) drive the construction scope. Our guide to managing your office fit-out covers what follows.
What good stacking and blocking decisions look like
Adjacency
Adjacency means who sits near whom. Map the workflows between teams: who hands work to whom, who needs quick conversations, who needs confidentiality. Then put the strongest relationships on the same floor or the floor above or below. The aim is to cut the travel time and bottlenecks between teams that depend on each other. Facilities guidance on space planning makes the same point about mapping collaboration workflows.
Noise, light and comfort
Acoustics, lighting, ventilation and amenities all shape how a floor feels. Block noisy functions (sales, customer service, collaboration hubs) together, away from teams doing deep work. If a floor cannot be zoned well, acoustic treatment and partitions become part of the plan. Our guides on office partitions and office arrangement ideas cover practical options.
Accessibility and inclusion
An inclusive plan treats movement through the building as part of the working day. The NSW Government’s Accessible Office Design framework includes connections between floors, corridor links and emergency exits as part of the employee’s accessible workplace journey. For stacking, that means asking whether the functions everyone uses (reception, kitchens, wellbeing rooms, the largest meeting spaces) are reachable by step-free routes, and whether anyone with limited mobility is being placed on a floor that depends on a single lift. For blocking, it means keeping routes clear and wide enough, and placing quiet and sensory-friendly spaces where they are easy to find and reach.
Growth and flexibility
Plan for the office you will have, not just the one you have. Leave capacity in the stack, choose zones that can be reconfigured and avoid fixing a team permanently to a spot when its headcount is unstable. A common approach is to hold a floor or a zone as flexible space and allocate it as the picture becomes clearer. For the thinking behind this, see our piece on smart office space allocation.
A worked example
Consider a professional services firm of 120 people moving into a three-level tenancy. The teams are Leadership (8), Finance and HR (18), Sales and Client Services (35), Delivery (45) and Operations (14).
- Stack. Sales and Client Services take the entry level, close to reception and the large client meeting rooms. Delivery takes the middle level, where it can use a larger open floor and project rooms. Leadership, Finance and HR share the top level, which suits confidential work, with Operations on the same floor so it sits near Finance. A feature stair links the entry and middle levels because Sales and Delivery work together daily.
- Block. On the entry level, Client Services sits at the windows and the collaboration hub is near the stair. On the middle level, project rooms sit along one edge and the focus zone is placed furthest from the stair and the kitchen. On the top level, Leadership has its own zone near a meeting suite and Finance sits behind it, away from the main thoroughfare.
- Check. Each zone is tested for step-free access, a clear route to the exits and a sensible walk to amenities. Growth space is held in the Delivery floor.
This is an illustration, not a case study. The numbers are invented to show the method.
Common mistakes to avoid
- Starting with the layout instead of the data. Pretty drawings before an area schedule produce plans that cannot be built.
- Stacking by hierarchy. The best floor does not automatically go to the most senior team. Put it where it supports the work.
- Ignoring the stairs and lifts. Adjacent floors only work if people can move between them easily.
- Filling every floor on day one. No allowance for growth means another restack within a year or two.
- Treating the stack as a one-off. Teams change. The plan should be reviewed when headcount, hybrid patterns or leasing arrangements change.
Why workplace strategy comes before the stack
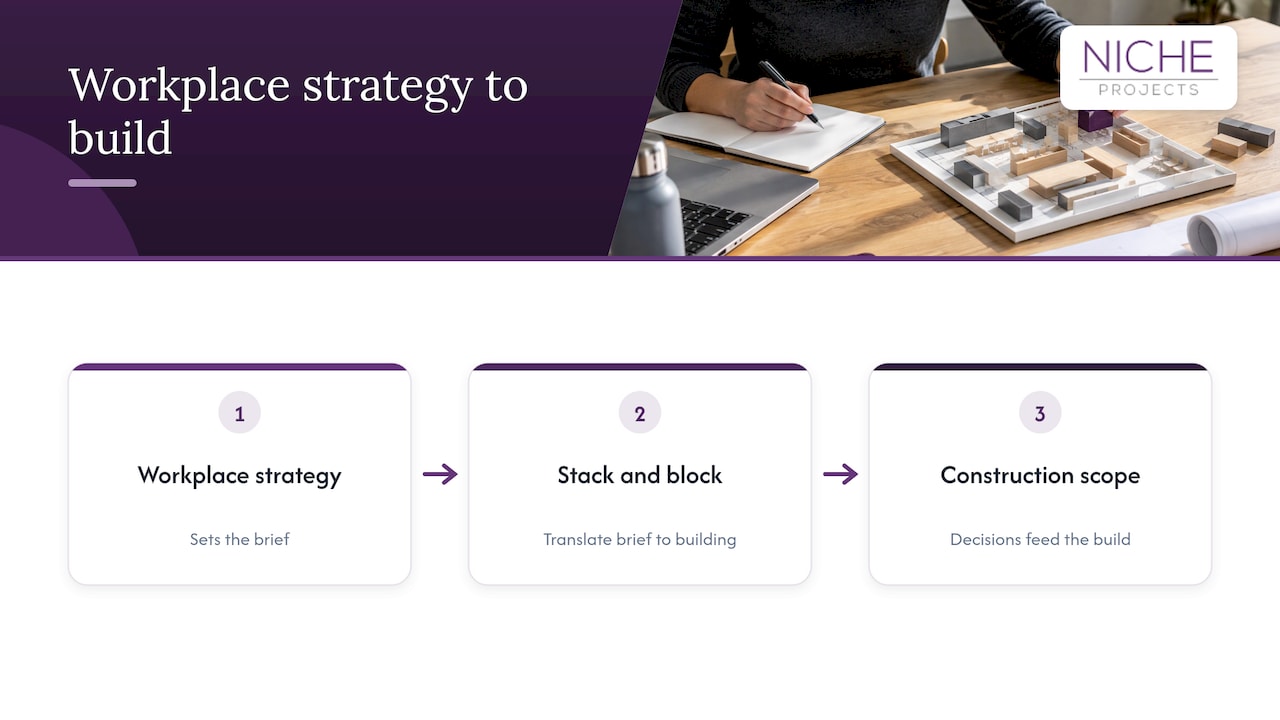
A stack plan answers the question “where does each team go?” It cannot answer “what should this office do for the business?” That comes first. Workplace strategy sets the brief: how people work, which spaces they need, how much of the office is shared and how the space should support culture and productivity. The stack and block plans then translate that brief into a building. Our explainer on workplace strategy, its inputs and how it works shows what goes into it, and the article on integrating workplace strategy into a refurbishment shows how the strategy flows into the build.
The practical benefit of keeping these steps together is that the plan on paper is the plan that gets built. The decisions you make in the stack (which floors need new partitions, services, bathrooms or soundproofing) feed straight into the construction scope, so nothing is lost between the strategist, the designer and the builder.
How we can help
Niche Projects combines workplace strategy, office design, space planning and construction management for commercial clients. That means one team can work with you on the area schedule, build the stack and block plans, carry them into Sydney office design and deliver the result through a Sydney office fitout or refurbishment. If you want a starting point before any commitment, our free office space plan is a good place to begin. To discuss a move, consolidation or refresh, start from our workplace strategy page.
FAQ
What is the difference between stacking and blocking?
Stacking decides which floor each team or function goes on in a multi-level building. Blocking decides where each team sits within a single floor, in relation to the core, windows and circulation. Stacking comes first, blocking follows, and desk layouts come last.
Do I need a stack plan if my office is on one floor?
Not a stack plan, but you still need the blocking step. On a single floor, the question is which zone each team occupies, so you work from the area schedule straight to a block plan. The same principles of adjacency, noise separation and clear routes apply.
What information do I need to create an office stacking plan?
Start with an area schedule listing each function, its headcount and required area. Add the floor capacity and building constraints such as loading limits, services and fixed-level functions. Then gather input from employees on how they work, and an estimate of future growth, as WorkSafe Victoria’s office layout guidance suggests.
How often should an office stack plan be reviewed?
Review it whenever something material changes: headcount, hybrid attendance patterns, a lease event or a restructure. It is also worth a check before any refurbishment so the build matches how the business actually works. A plan that is not kept current stops being useful quickly.
Does blocking and stacking only apply to large offices?
It applies to any office with more than one team to place, but the payoff grows with size and with the number of floors. Smaller businesses can use the same logic on a single floor to decide which teams sit together and where the quiet and collaborative zones go.
Sources
- Stacking & Blocking | Workplace & Office Design
- Office health and safety: Office layout and design, WorkSafe Victoria
- Accessible Office Design, NSW Government
- Optimizing workspaces with block and stack planning
- Office Space Planning: A Workplace Leader’s Guide
- Space Planning in Facilities Management: Process & Tools